by Stephen Satterly, School Safety Monthly, March 2015
Earthquake preparedness for schools may seem daunting. After all, earthquakes would seem to be cataclysmic events that rapidly overwhelm a school’s emergency response capabilities. There is some truth to that statement. School safety leaders need facts to discern the truth and better prepare for earthquake risks. Using a fact-based risk assessment and preparedness checklist can help school safety leaders in preparing for an earthquake while avoiding alarmism.
1. Assess the Risk
A critical skill for a school safety leader is to conduct a risk assessment to answer the question, “Are earthquakes a concern for us?” Next, ask “Is there data available on the risk?” If not, the risk may not rise to the level of action.
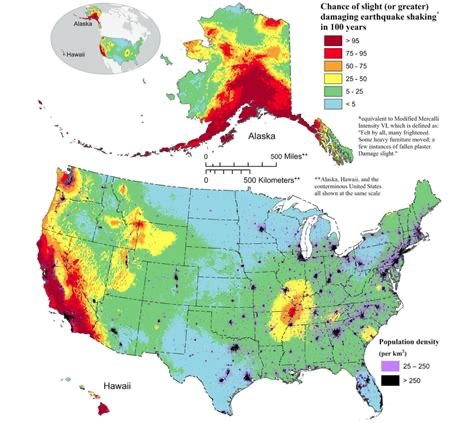
The U.S. Geological Service (USGS) has developed a National Seismic Map to illustrate earthquake risk for the 48 contiguous states. The map (shown on the next page) can be downloaded from: USGS.gov
The red areas in California should come as no surprise, but some of you may be surprised at the red area in the Midwest. This area contains the New Madrid Fault, which poses earthquake risk in the Midwest. More detailed data on Hawaii and Alaska can also be found at the USGS website. Alaska has the most earthquakes per year of any state; however, many of these occur in rural, uninhabited areas, and thus the level of risk is relative to population density.

2. Prepare for the Risk
Preparing for earthquakes is based on your response plans. Responding to earthquakes is done in two stages: during the quake and after the quake. ShakeOut has a website with excellent information on earthquake preparedness:
STAGE 1: During the quake
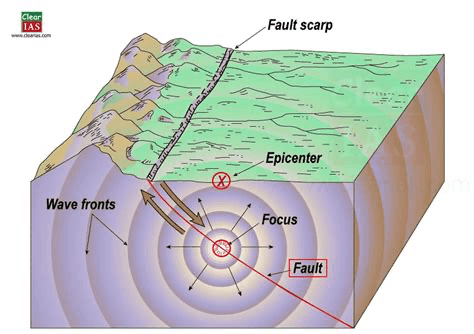
Earthquakes happen with little warning. You may hear a rumbling, or you may feel the ground or floor beneath you shaking, rolling, or buckling. You may see chandeliers or ceiling fans swaying and objects falling off shelves. During an earthquake, the generally recommended procedure is “Drop, Cover, and Hold”:
i. Drop
Immediately upon sensing an earthquake, drop to the ground. This moves your center of gravity closer to the ground, helping stabilize your position.
ii. Cover
Get under a desk, table, or anything within arm’s reach that can protect you from falling objects. If you are unable to find cover, use your arms to cover your head. Do not try to run to cover, as running will be very difficult and may lead to injury.
iii. Hold
Hold on to a table or desk leg or any object to help keep you as stable as possible.
STAGE 2: After the quake stops
After the ground stops shaking, it will be imperative to evacuate the building, as parts of it, or all of it, may have been compromised by the earthquake. The standard evacuation protocol can be used for this purpose with some minor modifications:
i. Evacuate
Establish a safe route out based on the building’s condition and potential hazards. This is a key time when alternate evacuation routes may need to be used, as rubble, fire, or utility damage may block normal exits.
ii. Note the location of anyone who is trapped
As a school leader, your first priority should be to maintain your own safety. You cannot protect staff and students if you are not safe. Attempting an unsafe rescue can cause problems for students and staff who need you to be safe to help them.
iii. Retain accountability
As soon as it is safe to do so and you have taken other critical steps, perform student accounting procedures and account for any visitors or other staff under your care. When first responders arrive, they will need to know how many people you have in your group, where any trapped people are, and how many people are missing. This will help them develop the best ad hoc response plan.
iv. Seek a safe area to assemble
Earthquakes create widespread damage, so it is almost certain that help will not arrive quickly. Secure drinking water and food if possible. Avoid sheltering in areas near trees, power lines, buildings, or other tall objects whenever possible.
v. Communicate
As soon as you and those in your care are secured, contact public safety and school district personnel to let them know your status. They will be trying to communicate with parents and possibly the media. Keep your communications short and factual. Know that phone lines and radio towers may be down. In these circumstances, text messages may still get through. Have a plan in place to communicate in primitive conditions by using runners or other means.
In summary, earthquake preparedness is a straightforward process once you break it down into a risk assessment approach and create appropriate emergency procedures. You may have local situations that require adding to or deleting from this checklist based on your unique level of risk. As with any emergency procedure, exercise your plan regularly. In our school safety assessments, we often find that earthquake drills are overlooked in the set of drills performed at the school level because of the low perceived level of risk. Because of the rare and unexpected nature of earthquakes, it is even more important to have a solid grasp of your earthquake procedures so that you can implement them quickly during a crisis. This is hopefully something you will never need, but if you do, you want the plan to work.

Leave a comment